5 Easy Felt Crown Embellishment Ideas
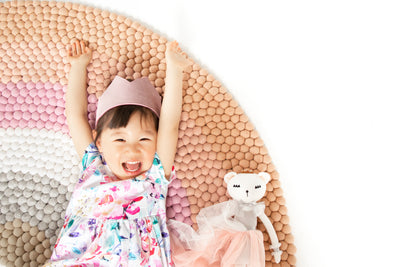
Making a felt crown is more than just a fun, easy sewing project – it’s a way to create magical memories for the little ones in your life. Whether you’re making this project to start a birthday tradition, make a keepsake for their dress-up box, or to create a unique handmade gift, it is sure to put a smile on their face. Unlike store-bought alternatives, a handmade felt crown can be made with customised colours, fabrics, and embellishments, so the kids will love it when you add their favourites to make it personalised just for them!
You can make this felt crown even if you are a complete beginner at sewing!
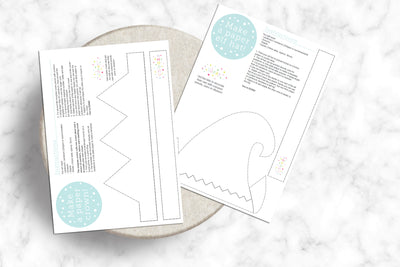
To make it easy, you can download our free DIY crown template and video sew along HERE.
The 5 sewing embellishment techniques we’re sharing today will help you add that wow factor to your DIY felt crown. Whether you’re making a felt crown as a handmade gift, for imaginary playtime or as part of a kids costume. You can use these embellishment ideas as inspiration to create a unique crown for the kids without the stress.
1. Add a Decorative Trim
An easy way to add a special touch to your felt crown is by adding some trim along the edges. It’s quick, simple, and instantly adds texture and style!

Ideas to try:
- Faux fur or strings of pom-poms for a fun, playful look.
- Ric-rac or lace for a vintage-inspired style.
- Ribbon or other decorative trims to add a polished finish.
A range of different trims are usually available with in/near the ribbon section of your craft or fabric store.
How to attach it:
Attach your trim along the base of your crown, or around the edges, depending on the trim you are using and the look you want to achieve. The most commonly used option would be along the bottom edge of the crown. To do this you can
- Sewing option: Sew your trim along the very edge of the crown with a simple straight stitch. If you are making a double-sided crown (with 2 layers of felt) you can also add the trim in between the 2 layers of felt and sew together so it will sit out below the bottom edge of the crown.
- No-sew option: Use fabric glue or fusible tape along the sections of crown you would like your trim.
Adding a trim is an easy win—effortless but so effective!
2. Layer with a Fabric Overlay

A fabric overlay is when you add a layer of sheer fabric, such as netting or lace over the top of your sewing project. This easy embellishment idea creates a multilayer effect where you can still see your felt crown base underneath the shear fabric you have overlaid. Layering fabric over your felt crown creates a more detailed, professional-looking finish.
Ideas to try:
- Sparkly netting/tulle for a dreamy, fairy-tale effect.
- Lace for some vintage charm.
- Burnout Velvet for a rich, luxurious touch.
How to attach it:
Heat and Bond - The easiest way to attach a fabric overlay to your felt crown is to use heat and bond. Cut out the Heat and Bond in the shape of your crown and iron it to the front side of the crown (shiny side down). Remove the paper layer from the Heat and Bond and overlay your fabric. Cover with baking paper (so your iron doesn’t get all sticky from the Heat and Bond) and iron in place. Trim back the fabric overlay to match the shape of your crown. Optional - You can stich in place around the edge of your crown.
3. Add Decorative Stitching or Embroidery

This is a great chance to try some of those decorative stitches on your sewing machine you never knew you had! Or try out some simple embroidery designs along the base of your crown. Decorative stitching is a great sewing embellishment technique with lots of options to play with.
If you enjoy hand-sewing, a few simple stitches can make your crown look extra special. Don’t worry about perfect embroidery—small details go a long way!
Ideas to try:
- Decorative stiches from your sewing machine - along the edges pf your felt crown for a handmade feel.
- Hand stitch - Stars, flowers, or initials onto the crown for a personal touch.
- Beads or sequins sewn onto the points for extra sparkle.
How to do it:
Sewing machine—explore all those often-unused decorative stiches in your sewing machine. A line of decorative stitching along the base of the crown, around some of the edges or a patterned effect across the crown is a great way to experiment with different sewing stiches. Use a contrasting threat colour for it to stand out.
Hand Sewing – If you don’t mind hand stitching, use a simple blanket stitch around the edges, or trace out a more detailed design with a fabric marker. You could try some flowers, shapes, or a name or initial for a personalised touch. If you add some beading or sequins as embellishments, be sure to make sure they are securely attached with multiple stitches.
4. Decorate with Felt or Fabric Shapes

Cutting and attaching felt or fabric shapes is another great way to embellish your DIY felt crown. You can keep it simple with a few stars or add a detailed scene with lots of different shapes – the options are endless!
Ideas to try:
- Stars, hearts, or flowers for a whimsical look.
- Themed designs like dinosaurs, animals, or a fairy garden.
- Letters or numbers to personalise with a name or age.
How to attach them:
Use freezer paper or an erasable fabric marker to trace out your felt shapes.
- Sewing option: Hand or machine stitch each shape in place. Sew around the edges with a contrasting thread for an outlined effect.
- No-sew option: Use fabric glue or iron your shapes in place using Heat and Bond.
This is a great embellishment idea for kids to get involved with—let them choose their favourite shapes or theme.
5. Add a Fabric Underlay for Dimension

For a creative twist, try adding a fabric underlay backing behind the base of the crown. This adds contrast and makes the crown stand out more.
Ideas to try:
- Contrasting coloured or patterned felt/fabrics to create a pop of colour.
- Glittery or metallic fabric for a fun party crown.
- Lace or netting for a delicate, fairy-like effect.
How to attach it:
Heat and Bond - The easiest way to attach a fabric underlay to your felt crown is to use heat and bond. Cut out the Heat and Bond in the shape of your crown and iron it to the reverse side of the crown (shiny side down). Remove the paper layer from the Heat and Bond and underlay your fabric. Cover with baking paper (so your iron doesn’t get all sticky from the Heat and Bond) and iron in place. Trim back the fabric underlay to about 5mm from the edge of the crown front– more or less, depending on the look you are going for. Optional - You can stich in place around the edge of your crown.
This technique gives the crown a layered, professional look with very little effort!
Show off your makes
Embellishing a felt crown is a great way to add that wow factor to your sewing project - it doesn’t have to be complicated! Whether you use simple trims, stitched details, or layered fabrics, these easy embellishment ideas will help you create a crown that feels personal and special.
There’s no right or wrong way to do it—just have fun and get creative!
Which embellishment idea will you try first? Let me know in the comments, or tag me in your creations—I’d love to see them!
📌 Looking for more easy sewing projects? Take a look at our beginner friendly SEWING PATTERNS for more fun, creative makes! HERE
Remember to DOWNLOAD YOUR FREE DIY CROWN TEMPLATE HERE